For a long time, Soundtoys Decapitator has been a really famous product in numerous ITB (In The Box, using only plugins) mixing. From natural saturation effects to powerful overdrive sounds, it gained great popularity as a versatile and excellent saturator.
For those who are still unfamiliar with Decapitator or only utilizing some of its features, in this article, we will take a closer look at the detailed characteristics of Soundtoys Decapitator. We will also introduce tips for effectively utilizing a saturation plugin.

This review was conducted with an NFR (Not for resale) license provided by Soundtoys through Plugin Boutique. If you purchase the product through this link, it will be of small help to Plugin Boutique and myself. Currently, there is a Soundtoys discount going on until May 10th.
Contents
What is a Saturator?
In the digital mixing process, a saturator can be considered an almost essential tool. Especially when recording with 'dull' home recording equipment that hardly captures the advantages of analog hardware, a saturator forms pleasant overtones, adding warmth and punch to the mix.
Basic Interface
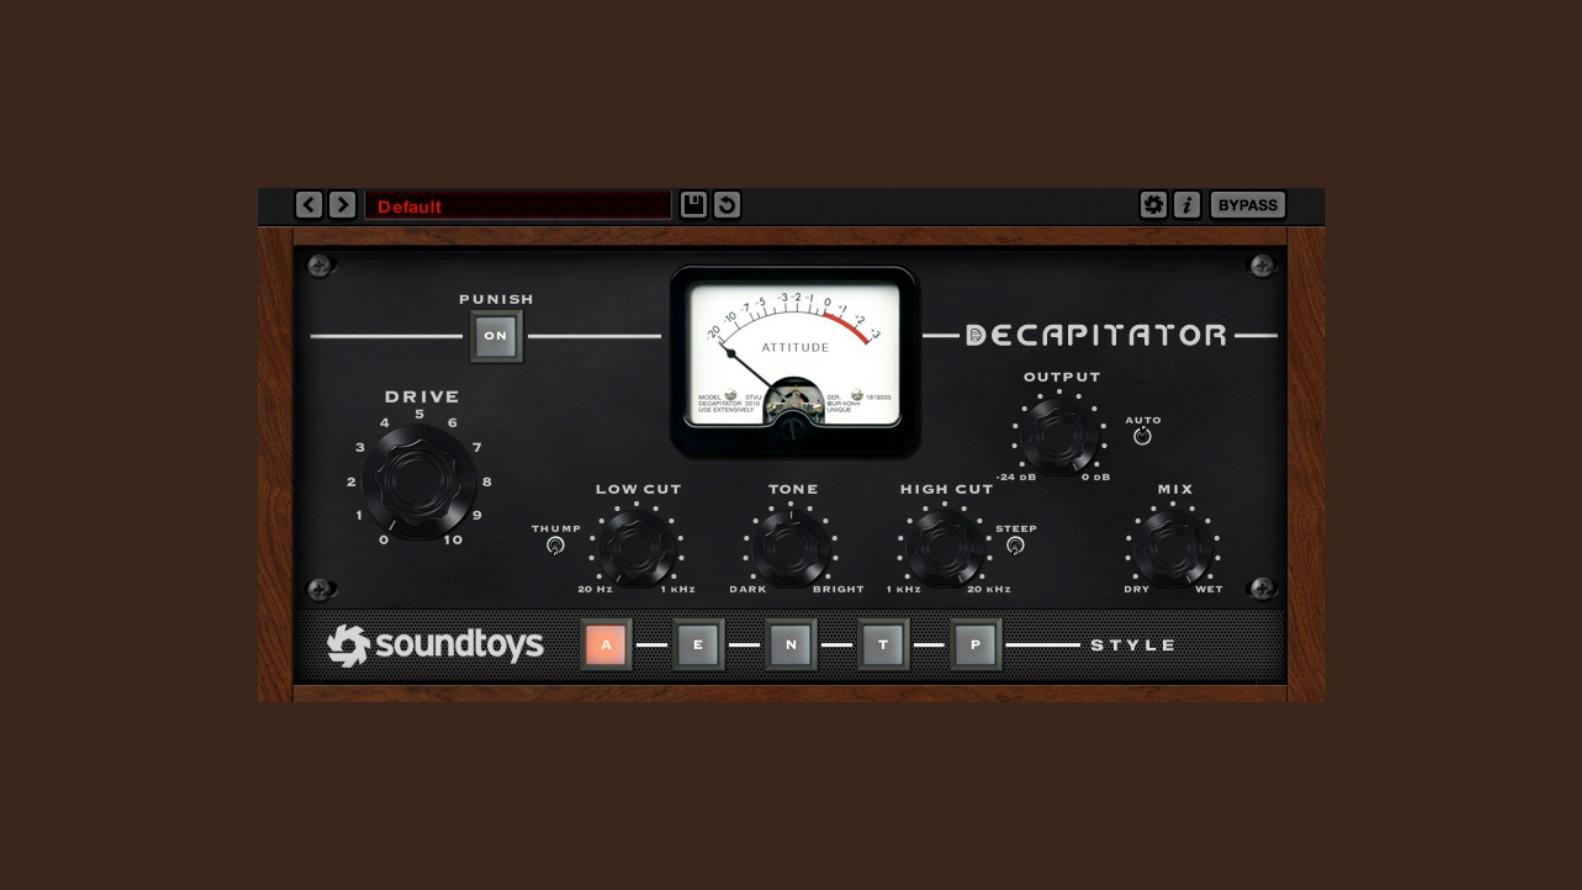
Decapitator's interface is very intuitive. As you turn up the DRIVE knob, the input level increases, and saturation occurs. Since the overall volume also increases, you need to reduce the OUTPUT knob. By default, the AUTO button is turned on, so when you increase the DRIVE, the OUTPUT automatically decreases.

The PUNISH button boosts the input gain by 20dB. This button is not linked to the OUTPUT AUTO, so it should be used with caution. It seems useful when the original source is too quiet or when creating an artificial overdrive tone.
All you have to do is just load the plugin and turn up the DRIVE knob. You'll be able to immediately feel the effect of the saturator.
Try increasing the DRIVE knob to the minimum level where the sound doesn't distort too much but produces a pleasantly smooth tone. Alternatively, you can excessively increase the DRIVE and reduce the MIX knob towards DRY to appropriately mix the original sound with the saturated one.

Saturation Characteristics of Decapitator
Decapitator's saturation is quite strong. Depending on the audio source, you can often hear the sound breaking up even with just a slight increase of the DRIVE. Once it exceeds 0VU on the VU meter, a clear distortion phenomenon occurs that anyone can recognize.

Even with the DRIVE set to the minimum, overtones are generated, and different EQ curves are formed depending on the preamp style selected at the bottom. You need to either completely bypass or set the MIX to 0% (DRY) to have no effect applied.
EQ Section
There are LOW CUT, TONE, and HIGH CUT knobs for basic tone shaping. These knobs operate before the MIX knob. Therefore, unlike simply inserting a new EQ plugin after Decapitator, they dynamically change the tone according to the DRIVE setting.

The THUMB switch next to the LOW CUT adds a bit of resonance to the low-cut filter, making the low-end sound tighter. The STEEP switch next to the HIGH CUT changes the Q value, making the high-cut filter's slope steeper.
The TONE is a Tilt EQ that adjusts the overall tonal balance between darker and brighter. However, it creates a unique EQ curve shape depending on the preamp style, which will be discussed later.
One tip is to take advantage of the EQ curve changes according to the DRIVE amount. If you want a more neutral and flat EQ, reduce the DRIVE as much as possible. Conversely, if you want a unique and ever-changing style, increase the DRIVE while lowering the MIX knob to maintain overall transparency, but obtain a unique textured saturation.


Selectable Preamp Styles
Soundtoys modeled a total of 5 hardware preamp styles in Decapitator. A, E, N, T, and P were inspired by the sounds of the following products in order:

- Ampex 350 Tape Drive Preamp
- Chandler EMI TG Channel
- Neve 1057
- Culture Vulture triode
- Culture Vulture pentode (more overdrive than triode)


The A style is arguably the least distorted among these. Therefore, the EQ curve also applies more naturally as intended. With E, N, T, and P, you'll experience more unpredictable EQ curves and stronger distortion.
Similarly, when manipulating the EQ section, if the DRIVE is set low, the resulting curve will be similar regardless of the style chosen. As the DRIVE increases, the differences between styles will become more pronounced.
Drawback: Lack of Anti-Aliasing and Oversampling
While Decapitator is an excellent saturator, it does have drawbacks. All digital plugins that generate overtones experience an issue called 'aliasing'. When frequencies exceed the project's sample rate range, they get reflected, causing unintended messy overtone residues.


To prevent this, plugins need to implement an 'anti-aliasing filter' or utilize oversampling technology. However, Decapitator lacks an oversampling feature. It might have an anti-aliasing filter implemented, but its effect doesn't seem significant.
Of course, this is not an issue exclusive to Decapitator. Many saturation plugins, especially those emulating tube-style distortion, face this common problem.
Therefore, it's necessary to slightly cut the high frequencies using the HIGH CUT or other EQs, or carefully listen to ensure Decapitator doesn't produce excessive distortion in the high frequencies. This is because the noise generated by aliasing is typically concentrated in the high-frequency range, creating a messy sound.
Tips for Utilizing Saturation
Now, let's introduce some tips that you can apply when using saturators like Decapitator.
Gain Staging
Saturators are very sensitive to the amount of incoming signal. If the original sound is too quiet, using a saturator will have little effect. If it's too loud, even a slight adjustment will significantly change the effect.
A reasonable starting point is to match the sound level to 0VU (-18dBFS) on the VU meter during recording or editing.
Using on an Aux Track
While saturators are often inserted on individual tracks, sending the original signal to an Aux track via Send can allow for more diverse applications.

In this case, the Aux track sends a separate output signal to the final master bus, so you can apply unique effects to the saturator without affecting the original signal. You can also apply other effects like EQ or delay before or after the saturator.
Alternatively, to address the aliasing issue, you can apply a low-pass filter only to the saturator to create saturation focused on the midrange without altering the original sound.
Applying Saturation to Delay
Another way I recommend utilizing saturation is to add it after a delay effect connected via an Aux.
Digital delays often sound too crisp with their repeated tails, which can sound unnatural. By using a saturator on the delay track, you can create overtones and tonal changes, mimicking an analog delay effect.
Preparing for Aliasing
When using saturation, here are some tips to help mitigate the aliasing issue mentioned earlier:
- Apply a filter or EQ to the high frequencies
- Use an Aux to create midrange-focused saturation
- Use built-in oversampling (not available in Decapitator)
- Use a host plugin like DDMF Metaplugin for oversampling
- Work in a project with a higher sample rate
However, many of these may not be practical to implement. The best approach is to be aware of the risk of aliasing, trust your ears, and find an appropriate saturation level.

With the influx of numerous saturation plugins today, there are many alternatives to Decapitator. However, despite being released about 15 years ago, I am confident that Decapitator will consistently deliver excellent results in mixes, anytime, anywhere.
This article was published in partnership with Monthly Mixing.
